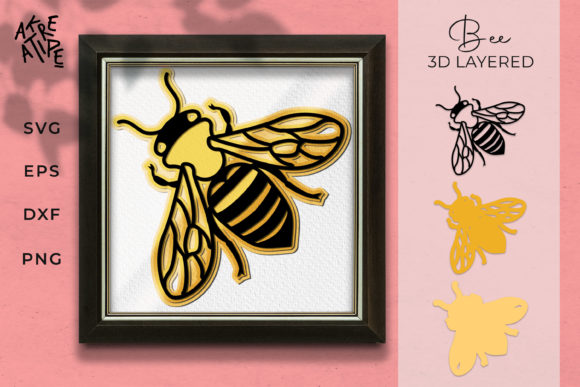
3D Layered Bee
Creating a stunning centerpiece or a personalized gift often requires more than just a simple cut; it demands depth, dimension, and a touch of artistic flair. The 3D Layered Bee design offers exactly that, transforming flat digital files into intricate, multi-dimensional art pieces. Whether you are looking to create home decorations, special occasion signs, or unique gifts for friends and family, this design provides the perfect foundation. However, achieving that professional, gallery-quality look depends heavily on how you prepare your materials and handle the cutting process. Many creators overlook the subtle details that separate a amateur project from a polished masterpiece, so understanding the nuances of this specific file set is crucial for success.
Understanding the Design Versatility
The 3D Layered Bee is not merely a picture of an insect; it is a structural blueprint for creating depth. By stacking multiple layers of material, each slightly offset or sized differently, you create a shadow effect that brings the image to life. This technique is particularly effective with the bee motif because the natural geometry of wings and body segments lends itself well to layering. While the colors displayed in preview images serve as an excellent example, one of the greatest advantages of this digital product is its adaptability. You can customize the color palette to match any theme, from vibrant spring florals to elegant monochromatic schemes for modern home decor.
This versatility makes the design suitable for a wide range of applications. It works beautifully as a wall hanging for a nursery, a decorative accent on a mirror, or a charming sign for a birthday party. Because the file includes multiple formats, you are not restricted to a single type of crafting machine or software. This flexibility ensures that whether you are a seasoned pro with high-end equipment or a hobbyist just starting out, you can utilize the design effectively.
Selecting the Right Materials
One of the most common pitfalls in layered paper crafts is choosing the wrong substrate. If you select a material that is too thin, the layers may collapse under their own weight or fail to hold the necessary shape. Conversely, if the material is too thick, your cutting blade might struggle, leading to incomplete cuts or jagged edges. For the 3D Layered Bee, recommended materials include wood, cardstock (specifically 65lb weight), plywood, MDF, paper, cardboard, and acrylic. Each of these offers a distinct aesthetic: wood and MDF provide a rustic, sturdy feel, while cardstock and paper offer a lighter, more delicate appearance.
When working with cardstock, ensure it is stiff enough to support the structure without being brittle. A 65lb cardstock strikes a good balance between durability and ease of cutting. If you opt for acrylic or wood, keep in mind that these materials require different blade settings and potentially slower cutting speeds to prevent melting or burning. Always test a small section of your chosen material before committing to the full project. This small step can save you hours of frustration and wasted resources.
The Importance of Adhesion
Even with the perfect material, the final result can be ruined by poor adhesion. As you assemble the layers, it is vital to ensure your adhesive mat has not lost its tackiness. Using a weak adhesive can cause the cardstock to lift during the assembly process, which often leads to tearing or misalignment. If your mat feels slippery or fails to hold the paper firmly, replace it immediately. Proper adhesion ensures that every intricate detail of the bee remains crisp and aligned, preserving the integrity of the 3D effect.
Navigating File Compatibility
To get the most out of the 3D Layered Bee, you need to understand which file format suits your tools. The listing provides a comprehensive set of files to accommodate various software environments:
- DXF: Ideal for users of Silhouette Studio Basic Free Edition. This format is widely compatible and accessible for those who do not wish to invest in paid software.
- SVG: Designed for Silhouette Studio Designer Paid Edition, Cricut Design Space, Make the Cut, Sure Cuts A Lot, and Brother Scan N Cut. SVGs are vector-based, allowing for infinite scaling without loss of quality, which is essential for maintaining the sharpness of the layered details.
- EPS: Best suited for professional graphic design software such as Adobe Illustrator, Corel Draw, and Inkscape. This format preserves complex paths and is ideal for customizing the design further before cutting.
- PNG: Provided for printing purposes and use in other software programs that do not support vector files. These raster images are useful for creating physical templates or for digital planning.
Choosing the correct file type prevents compatibility errors and ensures that all layers are separated correctly. Importantly, remember that this is a DIGITAL product. No physical items will be sent to you. Upon purchase, you will receive a zipped file containing the SVG, EPS, DXF, and PNG versions of the layered design. Ensure you have adequate storage space and the appropriate software installed before attempting to download and open the files.
Iron-On Transfer Considerations
If you plan to use the 3D Layered Bee design for fabric projects using iron-on transfer paper, there is a critical step that many beginners miss. When preparing your print job, you must click the “flip horizontal” button in your software. Without this mirroring step, the text and intricate details of the bee will appear backward on the final transfer. This is a standard requirement for all heat-transfer applications but is easily overlooked when rushing through a project. Always double-check your preview screen to ensure the design is mirrored correctly before sending it to the printer.
Final Assembly Tips
Once your layers are cut, the assembly phase requires patience and precision. Use a fine-tip glue applicator or double-sided tape dots to attach the layers. Start from the back and work forward, ensuring each layer is centered and secure. If you are using a setting with a lot of detail, take extra care to align the smaller components accurately. Misaligned layers can disrupt the visual flow and diminish the three-dimensional impact. By following these guidelines and paying attention to material selection, adhesion, and file compatibility, you can transform the 3D Layered Bee digital file into a breathtaking physical creation that stands out as a testament to your craftsmanship.